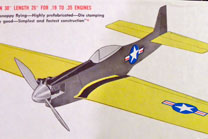
With the Kharkov complete, it is time to begin work on the second of my winter kit builds. This time around it is a control line stunt plane, the Sterling Models Inc. P-51D Mustang…a kit out of the 1960’s! This P-51 is a profile stunt plane with a 38″ wingspan and uses a .35 glow engine.
Two factors came together that led me to choose this particular kit as my next build. First, I really want to have a control line stunt plane ready for the next flying season. And I want it to be a profile stunt plane with flaps that is capable but durable enough to suffer a few bumps and bruises from both heavy use and from use as a primary stunt trainer. Second, if you read my November 20, 2013 post titled ‘Marine One – The ‘Metal Shop’‘ (Marine One – The ‘Metal Shop’), you will remember me mentioning that I was building a profile control line stunt model back in 1973. That model was under construction when it became the victim of a barracks inspection and I never saw it again. Writing that post got me wanting to actually finish building that specific model…only 40 years later! I realized that with this one build, I could satisfy both the desire to rebuild the unfinished model and end up with the control line stunt plane I want for this next flying season.
I couldn’t remember if the kit I was building in 1973 was manufactured by SIG or Sterling but a quick Internet investigation showed it to be a Sterling kit. And so I began a hunt for a copy of the very same kit. I knew that Sterling was no longer in business but quickly established that this particular kit had been picked up by Brodak and was available from them. They had updated the kit with a few modern improvements including laser cut parts, select AAA balsa, and extra hardware that the original kit did not come with. They offer it on their website at $87.99.
However, being a purist at heart, I wanted to see if a copy of the original Sterling kit was available anywhere. So I trotted over to eBay and there it was! I’ve been tracking kits on eBay for a year now and in all that time; I had not seen this kit for sale. Now that I decided I wanted one, there it was. And not only was it the kit I was looking for, it was never opened and was still in its’ original shrink-wrapping…truly a good omen!
I won the kit for $50, a good savings on the Brodak price, and walked away with an original copy of the kit I had in 1973! When the kit arrived, it still had the original price sticker on it…$23.95. Assuming that sticker was from the 1973 time period (it looked to be at least that old) that means that on an inflation adjusted basis, I would have paid $125.66 in today’s dollars for that kit back in 1973. My $50 eBay win was looking really good!
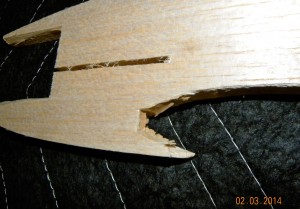
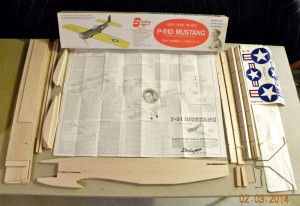
Upon opening the kit and inspecting the contents, I could see a few differences between kits manufactured 40+ years ago versus those manufactured today. The quality of the Sterling kit balsa is way below that which I am finding in current kits. Also, the parts are die cut versus being laser cut. I fully expected that and that is not an issue with me. Most of the die cutting is on par with what I remember from other kits of that era, but not all of it. The wing spars, wing leading and trailing edge pieces, and the main fuselage all look like they were cut out using a chain saw! And the cut out in the fuselage for the wing leading edge looks like they used a ball peen hammer to cut it out! I have included a photo of this fuselage cut out below. I am going to have to do some serious work in this area to get it looking and working like it should. The remainder of the kit (instructions, hardware, silkspan, decals, etc.) is as expected and is comparable to other kits of the era. I am sure that I would have received a much higher quality kit if I went with the Brodak version, but I did save $38 dollars and I got to scratch my purist itch by purchasing this version of the kit.
I would like to be a little different with the color scheme for this model. I’d like to go with something that is flashy and that will draw attention to the plane and therefore to control line flying. To that end, I would like to get suggestions for the color scheme. I would like to hear any and all suggestions so please comment with yours!
Then follow along as I build this kit and feel free to comment!
Photos of the Sterling P-51D Mustang kit:
(Click on the photos to get a large image with higher resolution)
Here is the kit as I received it. Notice the original shrink-wrapping still on the box!

Notice the ‘die cutting’ around the front of the fuselage wing cut out. This looks like they used a ball peen hammer where the wing leading edge goes!
